AWS EBS Encryption

AWS offers data at rest encryption in EBS storage offerings.  The following are characteristics of AWS EBS Encryption when in use.

                1. Data is encrypted inside the volume.

                2. All data moving on network from EBS device to instance is encrypted.

                3. All snapshots are encrypted.

                4. All volumes created from encrypted snapshots are encrypted.

                5. Encryption and decryption are handled transparently.

                6. Encryption has limited impact on latency.

                7. EBS encryption uses keys from KMS (AES-256)

                8. Copying unencrypted snapshots allows for encryption.

                9. Snapshots of encrypted volumes are encrypted.

To create an encrypted volume from an unencrypted volume using the following:

                1. Start with unencrypted volume.

                2. Create snapshot,

                3. Copy the snapshot using the encrypted option.

                4. Create a volume from the encrypted snapshot.

                5. Final volume will be encrypted because the snapshot was encrypted.

                6. Replace original volume with the encrypted volume.

AWS EBS Multi-Attach

Allows you to attach a single EBS to multiple EC2 Instance within the same Availability Zone.  This feature is only available in the io1 and io2 family of volume types.  The characteristics include:

                1.  Attaches same EBS volume to multiple Instance in same Availability Zones.

                2.  Each Instance has full read write permissions.

                3.  Must use file system that is cluster-aware (XFS, EXT4, etc)

                4.  Supports up to 16 EC2 Instances at a time.

                5.  Only available in io1 and io2 storage classes.

AWS CloudShell

AWS CloudShell allows you to perform tasks in the AWS environment without use of the Console.  Enabling you to execute scripts and other programmable objects.  The disadvantage is you have to logon to the AWS console and it is not available in all regions.  In this article we will show how to access the AWS CloudShell.

CloudShell Benefits:

  • Provides Linux like environment 
  • Accepts standard Linux commands 
  • Integrated with CLI 
  • Provides various shell options 
  • Persistent storage up to 1GB 
  • File upload and download up to 1GB  

1.  The following is required before you create IAM user for your AWS Free Tier Account.

  • An Active AWS Account.  

2.  Logon to AWS as an IAM user at URL:  https://signin.aws.amazon.com/

3.  From the Home Console you will see an icon

    4.  Click on it to open the AWS Cloudshell.

    5.  Here I will will create a directory ljcatt_work for storage of my files.

    6.  Now you can upload files from your local machine into CloudShell.  Locate a file on your local machine you wish to upload.   I have a file called c:/files/test.txt.   On the right hand side of CloudShell select Actions ? Upload and select your file.

    7.  Now if you perform the ls command you will see your file.

    8.  You can use all the CLI aws commands in Cloudshell.

    AWS CLI Setup

    AWS provides a Command Line Interface (CLI) to connect to your AWS environment instead of going through the AWS Management Console.    In this article we will cover the installation of AWS CLI in a windows environment and connect the CLI to an exist AWS environment.

    1. The following is required: 
    • An Active AWS IAM Account. 
      • Access keys for your account. 

    2. Install the AWS CLI on your local machine.  This can be retrieved at https://aws.amazon.com/cli/   additionally you can get a walk through of the installation process at https://docs.aws.amazon.com/cli/latest/userguide/cli-chap-getting-started.html 

    3. Open a command prompt on your local machine and execute the command:  msiexec.exe /i https:/awscli.amazonaws.com/AWSCLIV2.msi  

    4. To confirm the installation once completed, close your command prompt and reopen.  Execute command:  aws –version 

    5. Logon to AWS as the root user at URL:  https://signin.aws.amazon.com/ 

    6. In the search bar type IAM and open the IAM console. 

    7. Select user from the left hand side menu bar. 

    8. Select the My security credentials. 

    9. Go to Access keys and select Create access key 

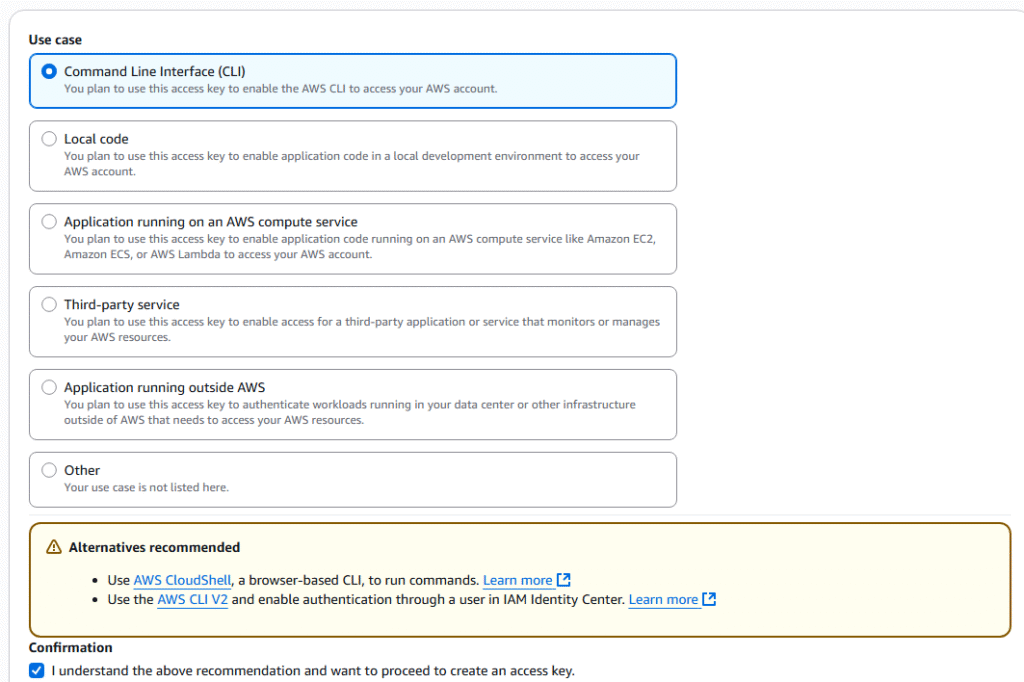
    10. Select Command Line Interface (CLI), check mark the confirmation and select Next. 

    11. Enter a description tag and select Create access key. 

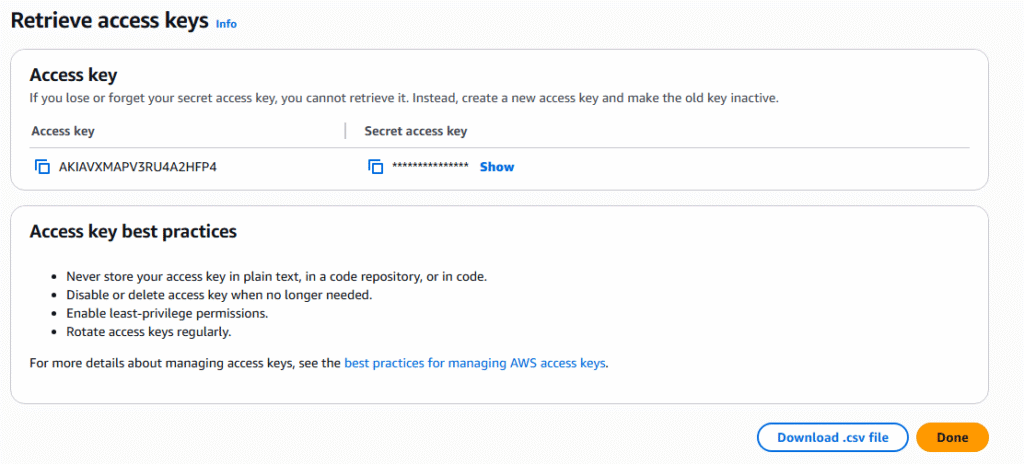
    12. Access key will be generated, download it as a csv and press done. 

    13. Now you have access key to enter your AWS environment via the CLI. 

    14.  Open a command prompt 

    15. Type: aws configure 

    16. Enter the Access key  and Secret Access Key provided from step 12 (this is located in the CSV file you download),  default region name, default output format and hit enter. 

    17. Now you can test your CLI connection to your AWS environment, view list of users. 

    18. This completes setup of your CLI