AWS RDS – Read Replicas vs Multi AZ


Read Replicas allow us to scale our read operations in AWS RDS.

They have the following characteristics:

  1. You can have up to 15 Read Replicas

  2. They can be within same AZ, Cross AZ, or Cross Region

  3. Replication is Async from R/W database so they eventually are consistent

  4. The Read Replica can be promoted to become its own database

  5. Application must update the connection string to use Read Replicas.

  6. Read Replicas can be setup as Multi AZ for Disaster Recovery, but it will not have SYNC updates, so can loss data.

  7. Use Case for Read Replicas: Moving Reporting and Analytics off read/write database.

======================

Networking Cost associated with Read Replica:

  1. Network costs are incurred when data goes from one AZ to another normally.

  2. Read Replica traffic within the same Region and different AZ are not charged a network fee.

  3. Read Replica traffic in different Regions and different AZ are charged a network fee.

======================

RDS Multi AZ is normally used for disaster Recovery and they have the following characteristics:

  1. You have an RDS Standby database in one AZ with the RDS Master database in another AZ.

  2. The RDS Master sends SYNC replication to the Standby RDS, the writes to standby RDS must be completed before transaction on Master is complete.

  3. One connection to RDS DNS name with automatic app failover to standby.

  4. This failover increases the overall availability of the RDS.

  5. Failover occurs during loss of AZ, loss of network, loss of instance, or loss of storage.

  6. No manual changes to application is required during failover.

  7. This is not used for scaling of any type.

======================

Moving RDS from Single AZ to Multi AZ

  1. Zero down operation, never loss use of the RDS database.

  2. Only need to click “modify” for the database and select multi-AZ.

  3. Internally, the following occurs:

    a. Snap shot is taken of the Master database.

    b. New database creased from snapshot in a new AZ

    c. Synchronization is established between the two databases.

RDS Overview

RDS (Relational Database Service) is used to manage Relation Database Systems.

The following RDBMS that are supported by AWS RDS are:

1. Postgres

2. MySQL

3. MariaDB

4. Oracle

5. Microsoft SQL Server

6. IBM DB2

7. Aurora (AWS Proprietary database)

The Benefit using RDS over deploying your own database system:

1. Automatic provisioning of OS patching

2. Continuous backups and restore to specific timestamps.

3. Monitoring dashboards

4. Read replicas for improved read performance

5. Multi AZ setup for disaster recovery

6. Maintenance windows for upgrades

7. Scaling both vertical and horizontal

8. Storage backed by EBS

You cannot SSH into your RDS instances.

We should highlight the benefit of RDS Storage Auto Scaling feature which is one of the greatest benefits to managing an RDS. You simply enable the feature and set a Maximum Storage Threshold for the entire Database Storage and you achieve the following:

1. Dynamically increases storage on demand when.

a. Free space falls below 10%

b. Low storage level lasts for at least 5 minutes

c. 6 hours have passed since last increase.

2. RDS detects low storage levels automatically.

3. Avoids manual scaling your database storage.

4. Benefits application with unpredictable storage requirements.

Cons of using RDS

  1. No OS access
  2. Higher Cost compared to traditional dabase configuration
  3. Limited configuration options and not costumizable.
  4. Performance degradation of database.
  5. Limited on its scalability.
  6. Dependent on AWS with sever restrictions on administrative functions of customer.
  7. May require downtime controlled by AWS not customer.
  8. Zero transparency on database maintenance.
  9. Lacks many database features of standard installation and configuration.

AWS Auto Scaling Groups (ASG) – Scaling Policies


Scaling Policies allow you to set parameter for the scaling groups in and out operations. Typical things you would place scaling policies on are: CPUUtilization and RequestCountPerTarget. Policies have a cool-down period for both in and out scaling with a default of 300seconds or 5 minutes. The ASG will add or remove one instance at a time and evaluate if further increase or decrease is necessary. Using standard AMI allows your cool-down period to be reduced because you will see the effects of adding or removing instances quicker.

==================================================

1.  Logon to AWS as an IAM user at URL:  https://signin.aws.amazon.com/

2.  From the Home Console type EC2 in the search bar, select the star next to EC2, and select EC2

3.  On the left hand menu bar select Auto Scaling Groups.

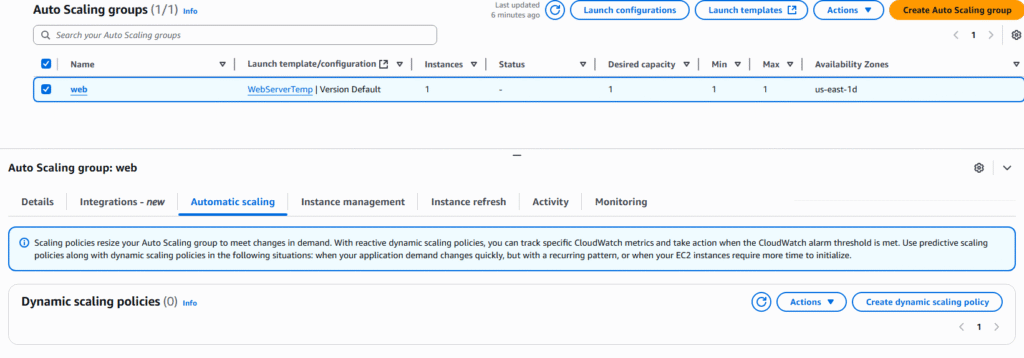
4.  Select the ASG you wish to create a policy for and scroll down to Automatic scaling.  Under Under here you can setup three different types:

  • •.Dynamic scaling policies – based on percentage of use of CPU, Connects,etc 
  • •.Predictive scaling policies – based on EventWatch alerts. 
  • •.Scheduled actions  – based on times ie working hours or work days. 

Dynamic scaling policies:

5.  Predictive scaling policies:

6.   Scheduled Actions:

7.  Select Select metric button and chose the metric that best fits.

AWS Auto Scaling Groups (ASG)

Auto Scaling Groups (ASG) allow you to have more EC2 Instances during times of high demand and less EC2 Instance (reduced cost) during times of less demand.   ASG scales up and down in real time as demand increases and decreases.  

ASG Characteristics:

    1. Scale out (add EC2 instances) as the workload increases.

    2. Scale in (removes EC2 instances) as the workload decreases.

    3. Can define minimum and maximum number of EC2 instances.

    4. Automatically registers new instances with load balancer.

    5. Starts new EC2 instance if original is unhealthy or terminated.

    6. ASG are free, but you pay when EC2 instances are running.

    7. ASG can terminate EC2 instances if ELB says they are unhealthy

Auto Scaling Group Attributes

    1. Launch Template (formally Launch Configurations) gives initial parameters of ASG

    1. AMI + Instance Type

   2. EC2 User Data

    3. EBS Volumes

    4. Security Groups

    5. SSH Key pair

    6. IAM Roles for EC2 Instances

    7. Network and subnet information

    8. Load Balancer Information

    2. Min Size, Max Size, and Initial Capacity

    3. Scaling Policies

    4. Scale ASG out/in based on CloudWatch alarms

========================================

1.  Logon to AWS as an IAM user at URL:  https://signin.aws.amazon.com/

2.  From the Home Console type EC2 in the search bar, select the star next to EC2, and select EC2

3.  On the left hand menu bar select Auto Scaling Groups.

4.  Click Create Auto Scaling group button.

5.  Enter a name for your ASG and click the Create a Launch template link

6.  Enter a template name and description.

7.  Under Application OS, select Quick Start, Amazon Linux.

8.  Under Instance type select t2.micro and under Key pair select any already existing pair for which you have the pem.

9.  Under Network settings select existing security group.

10.   Leave storage at 8GB and expand advance section and in user data at bottom, place startup instructions and click the Create launch template button.

11.  You will receive confirmation of success.

12.   Back at the ASG Creation page, select the template you just built and press Next button Note: you may have to hit the reset button.

13.   On the next page enter 1 for Maximum values and AZ where you want the new instances. And press Next.

 14,   At the Integrate with other services page, choose Attach to an existing load balancer and choose your load balancer, click Next

 15.  At the next pages accept the defaults and press Next.

16.   At the next pages accept the defaults and press Next.

17.   At the next pages accept the defaults and press Next.

18.   Review the configuration and press Create Auto Scaling group.

AWS Connection Draining


Connection Draining (CLB) or Deregistration Delay (ALB and NLB) is the time it takes to complete “in-flight requests” while an instance is de-registering or unhealthy. The load balancer will stop sending new requests to the EC2 instance in a de-registering state. This time EC2 Instance will complete current transaction while in draining state and when complete shutdown.

AWS SSL Certificates

SSL/TLS allows network traffic to be encrypted during transmission.  SSL stands for Secure Socket Layer, it encrypts all connections between client and server.   TLS stands for Transport Layer Security, it performs the exact same task as SSL but is a newer version.   Today TLS certificates are most commonly used, but most people still refer to them as SSL.  Public SSL certificates are granted by a Certificate Authority and are used to encrypt traffic.

Working of SSL Certificate:

    1. Client —  Load Balance (validate certificate) — EC2 Instance

    2. Load Balancers use an X. certificate for SSL/TLS

    3. Management of certificates are handled by ACM (AWS Certificate Manager)

    4. You have option of uploading your own Certificate

    5. HTTPS listener service requires:

        a. Specification of default certificate

        b. Optional list of certificates to support multiple domains.

        c. Client can use SNI (Service Name Indication) to an instance

SSL – Server Name Indication (SNI) explained.

    1. SNI prevents the problem of loading many certificates onto a single web server.

    2. Its a new protocol so not all web servers use it.

    3. While using SNI, client gives the hostname of server in initial SSL handshake.

    4. The Load Balancer will find correct certificate based on hostname.

    5. Only available on ALB, NLB, CloudFront.

Load Balancer support

    1. CLB

        a. Supports only SSL

        b. Only support one cert, must have multiple CLB to support multiple hostname with different cert.

    2. ALB and NLB

        a. Support multiple listener with multiple certs.

        b. Uses Server Name Indication (SNI)

=================================================

1.  Logon to AWS as an IAM user at URL:  https://signin.aws.amazon.com/

2.  From the Home Console type EC2 in the search bar, select the star next to EC2, and select EC2

3.  On the left hand menu bar select Load Balancers.

4.  Select the load balancer you would like to add SSL certificate to scroll down and select Add Listener button

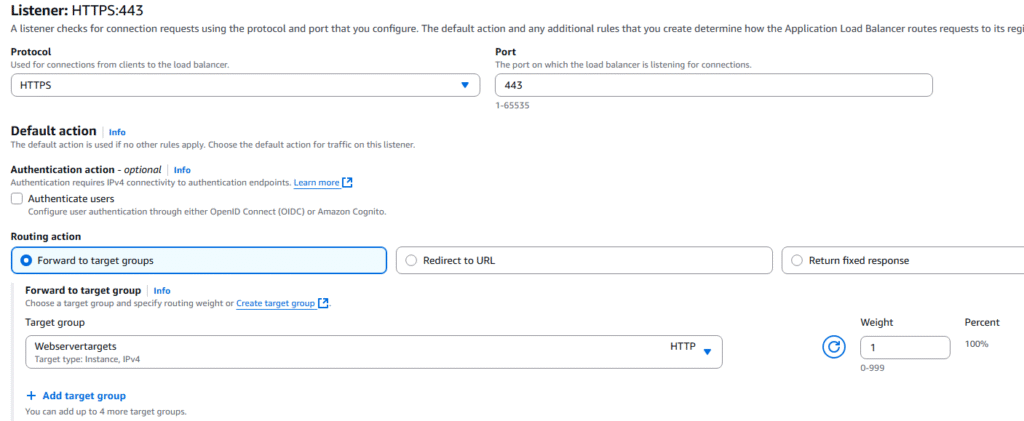
5.  Add the Protocol HTTPS, Port 443, and select a Forward to target group and select target group.

6.  Click on Request new ACM certificate

7.  Click Request a certificate

8.  Check Request a public certificate and Next button.

 9.  Enter your domain name and select the certificate and press Add button back on the Add Listener page.

AWS Cross Zone Load Balancing

Balancing work load in multiple Availability Zones can be performed in two separate ways: Using Cross Zone or without Cross Zone balancing.  Cross Zone Load Balancing will divide up the traffic by the number of instances targets, regardless of the zone they are located in. Without cross zone load balancing each zone receives the same amount of requests.

Cross-Zone load balancing characteristics:

        1.  Application Load Balancing

                a.  Enabled by default.

                b.  No charges for inter AZ data transfer.

        2.  Network and Gateway Load Balancing

                a.  Disabled by default.

                b.  You are charge for inter AZ data transfer.

        3.  Classic Load Balancer

                a.  Disabled by default.

                b.  No charges for inter AZ data transfer.

==========================================

1.  Logon to AWS as an IAM user at URL:  https://signin.aws.amazon.com/

2.  From the Home Console type EC2 in the search bar, select the star next to EC2, and select EC2

3.  On the left hand menu bar select Load Balancer

4.  At the load balancer page, select your load balancer ? Actions ? Edit load balancer attributes.

5.  Under Availability Zone routing is the option to enable and disable.

AWS Sticky Sessions (Session Affinity)

Sticky Sessions allows a users session to always be sent to the same exact Instance through a load balancer.  This option is available on the Classic Load Balancer, Application Load Balancer, and Network Load balancer.   This functionality is implemented through the use of a cookie with customizable expiration date that is passed to the requesting client machine.   The reason for implementation of Sticky Sessions is to ensure the client does not loss his session data.  Enabling Sticky Session can introduce an imbalance on applications.

Sticky Sessions Cookie Names and types:

1.  Application-based Cookies  

        a.  Custom cookie

                I.    Generated by the target

                ii.   Can include custom attributed required by application

                iii.  Names must be specified for each target group

                iv.  Cannot name AWSALB, AWSALBAPP, or AWSALBTG this are reserved

        b.  Application cookie

                i.  Generated by the load balancer

                ii. Named AWSALBAPP       

2.  Duration-based Cookied

        a.  Cookie generated by the load balancer

        b.  Cookie name is AWSALB for ALB and AWSELB for CLB

1.  Logon to AWS as an IAM user at URL:  https://signin.aws.amazon.com/

2.  From the Home Console type EC2 in the search bar, select the star next to EC2, and select EC2

3.  On the left hand menu bar select Target Groups

4.  At the target group page, select your target group and

5.  Select Actions ? Edit traget group attributes

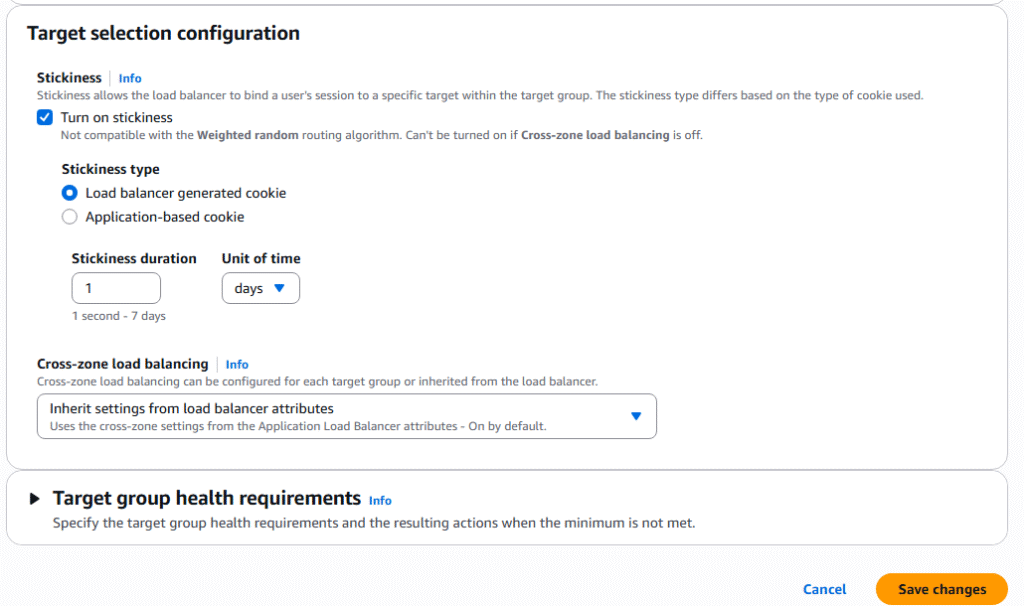
6.  Scroll down the page place a check mark on Turn on Stickiness, than you can either choose Load Balancer or Application-based ( Under application-based you have to name the cookie), Set the duration of the cookie. Finally select the Save changes button.

7.  Now after your first connection you will get the same application server for the duration of your cookie.