All posts by Larry Catt

AWS EBS

EBS (Elastic Block Store) is a network storage volume that is separate from you instances.   Allowing for a persistent data storage without an instance and can be mount to any instance within a specific availability zone.  EBS are not shared storage and can only be attached to a single instance at a time, but you can have multiple EBSs connected to a single instance.  In the free tier you can have up to 30GB of free EBS SSD or Magnetic storage per month.   Note:  EBS are network attached storage so it will cost the network latency for communication with EBS storage.  Non-root EBS storage device by default need to be removed separately from the instance they are attached to, root EBS storage is by default deleted with instances.   Here we will walk through the creation of a non-root EBS storage device.

1.  Logon to AWS as an IAM user at URL:  https://signin.aws.amazon.com/

2.  From the Home Console type EC2 in the search bar, select the star next to EC2, and select EC2

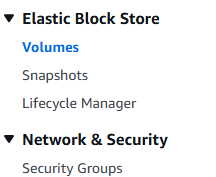
3.  On the left hand menu bar select Elastic Block Store ? Volumes.

4.  Under the Volumes page you will see the current EBS associated with your account, most of this will probably be root EBS drives from the creation of EC2 Instances.  Select Create volume button to create a non-root EBS.

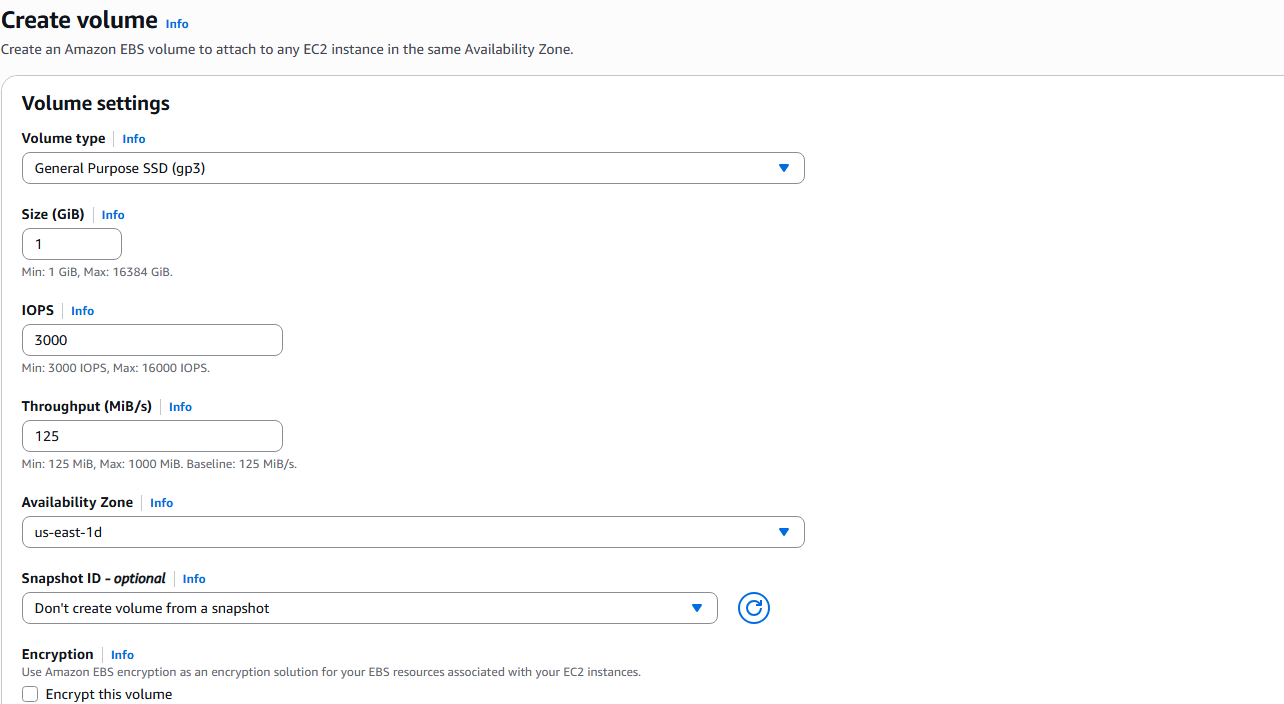
5.  On the Create EBS page, pay attention of the size to prevent additional charges, ensure that the Availability Zone is correct for where you want to use the storage, and select encrypted option if you want to use in hibernate instance.  Press the Create volume button to build your EBS.

6.  You will see a confirmation of the creation and can refresh the page until state is Available.

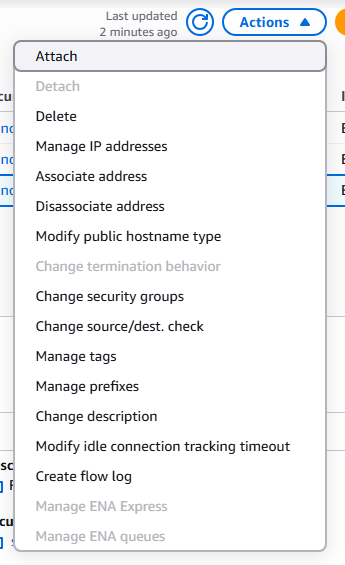
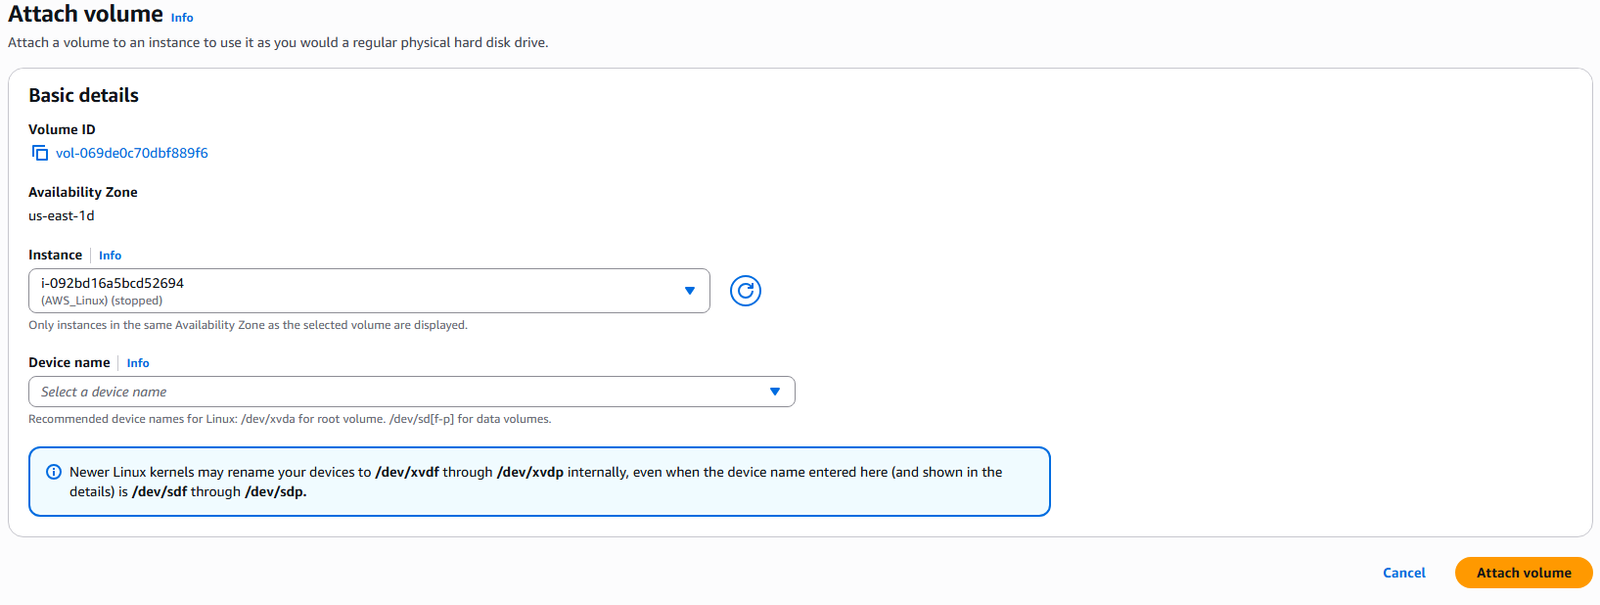
7.  Check mark you new EBS and select Actions? Attach volume

8.  Select the instance you wish to attach the storage to and click the Attach volume button.  NOTE: if no instance appear, verify that you selected the correct Availability Zone during volume creation.   The volume and instance must be in the same Availability Zone.

 9.  You can detach or attach volumes from the volume page or CLI, but the volume can only be attached to one instance at a time.

AWS EC2 Hibernate

AWS gives you the ability to startup and shutdown an EC2 Instance at any give time.   However, starting of an EC2 Instance is extremely close to starting up a physical server and requires time to read the system parameters, allocate resources, and start all processes necessary for the instance to become useful to end users.    AWS has a third option for maintaining EC2 Instances in a stopped state which severally reduces the time required for instance startup.   This is called EC2 Hibernate state.

Hibernate has the following characteristics:

        1.  In-memory data is preserved in a encrypted file under root EBS volume

        2.  Is brought from file back to RAM during restart with all services running.

        3.  Decreases overall startup time.

Hibernate has the following restrictions:

        1.  Supported by most Instance family but not bar metal.

        2.  RAM must be under 150GB and encrypted EBS volume.

        3.  AMI Support LINUX and Windows

        4.  60 day time limit on hibernate state.

==================================================

1.  Logon to AWS as an IAM user at URL:  https://signin.aws.amazon.com/

2.  From the Home Console type EC2 in the search bar, select the star next to EC2, and select EC2

3.  On the left hand menu bar select Instances.

4.  Select the instance which has the encrypted storage and hibernate options selected and click Instance state button.

5.  Select hibernate instance.

6.  Verify that you do want to hibernate the instance by clicking Hibernate.

7.  The Instance will now report as stopped with a confirmation of hibernate, select Instance state again and start instance option.

AWS Elastic Network Interfaces (ENI)

Elastic Network Inferfaces are logical components in your AWS Virtual Private Cloud which present Virtual Network Cards.  ENI can be created independently of EC2 Instances and can be assigned at any time on the fly and moved from one instance to another.  Each ENI has the options of:

        1.  One primary private IPv4 address and can have one or more secondary private IPv4 addresses

        2.  One Elastic IP address per private IPv4.

        3.  One Public IPv4 address

        4.  One or more security groups

        5.  A MAC address

        6.  ENI are bound to one availability zone.

______________________________________________________________________________________________________________________________________________________________

1.  Logon to AWS as an IAM user at URL:  https://signin.aws.amazon.com/

2.  From the Home Console type EC2 in the search bar, select the star next to EC2, and select EC2

3.  On the let hand menu bar select Network Interfaces.

4.  The page will display all currently existing ENI, we currently have created two EC2 Instances and AWS created two ENI for them by default.   Select Create network interface.

5.  Under details, enter the description of your network card, the subnet, Interface type, and Auto-assign of IP address.

6.  In the security groups section, select an existing group and enter a Tag if desired.  Click the Crete network interface to proceed.

7.  The creation will be confirmed on the next page.

8.  You can modify, associate, or delete the ENI by clicking on the ENI of choice and select Actions.

AWS Placement Groups

AWS placement groups allow you to have control over EC2 Instance physical layout in relationship to each other.   A good example of this would be a Cluster configuration were you are attempting to share the workload among multiple EC2 Instance.  Placement groups can be designed in one of three ways:

Cluster – Configured into low-latency group within a single Availability Zone.

        1.  Great network performance, but if AZ fails all fails

        2.  Big Data jobs, Applications requiring extremely low latency are examples

Spread – Spreads Instance across underlying hardware.  This is limited to 7 Instance per Placement Group per Availability Zone.    It is intended for Critical applications.

        1.  Minimize loss – Very low risk of failure.

        2.  Can span multiple AZ and EC2 Instances are on different physical hardware

        3.  Limited growth – only 7 Instances

        4.  Maximum availability of applications and Critical Applications where you need failures to   be isolated.

Partition – Spreads Instances across many partitions on different sets of rack within one Availability Zone.  Can Scale to 100s of EC instance per placement group.

1, Spread across multiple partitions – each partition is a rack.

              2.  Up to 7 partitions per AZ and can be spread across multiple AZ

              3.  Supports 100s of EC2 Instances

              4.  EC2 Instance in partition do not share partition with other EC2 Instances.

              5.  Partition failure can affect many EC2 instances but not other partitions.

              6.  Big Data operations is a good example of use.

      1.  The following is required before you create IAM user for your AWS Free Tier Account.

         -An Active AWS Account with admin level permissions.

                      -Multiple EC2 Instances

      2.  Logon to AWS as an IAM user at URL:  https://signin.aws.amazon.com/

      3.  From the Home Console type EC2 in the search bar, select the star next to EC2, and select EC2

      4.  On the left hand menu bar select Placement Groups.

      5.  Currently we have no placement groups, select Create placement group

      6.  On the Name the placement group, select Cluster, Spread, or Partition, and spread level or number of partition options you desire.  Press Create group to proceed.

      7.  During the creation of EC2 Instances you can select the partition group as an option for deployment of new EC2 Instances.

      AWS Elastic IP configuration

      AWS offers Elastic IP which are owned by the customer and can be assigned to any EC2 Instance the customer desires.   A single Elastic IP can only be assigned to a single EC2 Instance at any given time, it will be owned by a single customer until deleted regardless of use.  This instruction set will run through the creation of an Elastic IP in your AWS environment and assigning it to a single EC2 Instance.

      1.  The following is required before you create IAM user for your AWS Free Tier Account.

        -An Active AWS Account with admin level permissions.

        -Active EC2 Instance

      2.  Logon to AWS as an IAM user at URL:  https://signin.aws.amazon.com/

      3.  From the Home Console type EC2 in the search bar, select the star next to EC2, and select EC2

      4.  On the right hand menu bar select Elastic IPs.

      5.  Currently we have no Elastic IP address allocated to our AWS account, select Allocate Elastic IP address on the right hand side of the screen.

      6.  You have 4 choices for allocating a Elastic IP address in AWS.

      • From a pool of AWS public IP (cost is approx. $0.005 per hour regardless of use).
      • Public IP address you are bring to AWS.
      • Pool of public IP addresses you have already brought to AWS
      • IP address using IMAP (Normally disabled for EC2)

      7.  Select the Network border group closes to the EC2 Instance you desire to assign the IP to.  In this example us-east-1.   Leave Create accelerator alone and add optional tag to your Elastic IP. Next click Allocate.

      8.  You will see the new IP allocated to your AWS account.

      9.  To assign your Elastic IP address to an EC2 Instance,  Select the Elastic IP address with a checkmark on the far left hand side ? Click Actions ? Associate Elastic IP Address

       10.  Select Instance for association, enter the Instance ID and Private IP for the Instance and select Associate.

      11.  Now select Instances from your left hand menu bar.

      12.  Select the instance you choose above for the Elastic IP and you will see that it is allocated to the instance, even though the instance is currently stopped.

      13.  You can disassociate the Elastic IP by going back to Elastic Ips screen Selecting the IP ? Actions-? Disassociate Elastic IP address.

      14.  Confirm the Disassociation of the IP from the EC2 Instance by clicking Disassociate.

      15.   You can remove, delete or terminate an Elastic IP from your account by selecting the Elastic IP from the list with a check mark ? Actions ? Release Elastic IP Address.

      16.   Confirm the Release, by selecting the Release button

      17.   You will see a confirmation of the released Elastic IP and it will be removed from the available list.

      18.   This completes the Creation, Allocation, Reallocation, and Deletion of Elastic IPs in AWS.

      AWS Public vs Private vs Elastic IP Defined

      A summary of the differences between Public vs Private  vs Elastic IP in a AWS environment.

      Public IPs:

              1.  IP assigned to one Machine and is routable on the internet.

              2.  IP is unique and never duplicated at the same time.

              3.  Can easily be geographically located.

      Private IPs

              1.  IP only identifiable on private network.

              2.  IPs unique on single private network but can be duplicated on another.

              3.  IP must go through internet gateway as a proxy to access internet.

              4.  IP is that can be used are specified in a range.

      Elastic IPs

              1.  Stopping and Starting an EC2 Instance, public IP can change.

              2.  To get a stable IP for EC2 Instance, you have to request an Elastic IP

              3.  Elastic IP is a public IPv4 address you own until deleted.

              4.  Elastic IP can only be attached to single EC2 Instance at a time.

              5.  Elastic IP allow you to mask Instance failure with rapid remapping to another Instance.

      EC2 Instances by default come with:

              1.  One Private IP Address for internal AWS network.

              2.  One Public IP for internet.

              3.  SSH must use the public IP because it is assumed you are on outside network.

              4.  Starting and Stopping can cause the Public IP to Change.

      •  

      AWS Spot Request

      1.   The following is required before you create IAM user for your AWS Free Tier Account.

                      -An Active AWS Account with admin level permissions.

      2.   Logon to AWS as an IAM user at URL:  https://signin.aws.amazon.com/

      3.   From the Home Console type EC2 in the search bar, select the star next to EC2, and select EC2

      4.   Scroll down on right hand menu bar select Spot Request.

      5.   We can view the Pricing history for spot instances, by clicking Pricing history button.   This will allow you to see the saving you could obtain by choosing a spot instance over an on-demand instance.

      6.   Click on Create Spot Fleet request button to submit a request.

      7.   Complete the following request and select Launch for AWS to start processing your request.

      8.   Note:  At the bottom gives you a summary of the hourly cost of this spot request.

      9.   To simply request a single spot instance you place the request under Instance Create-? Advance options.

      AWS Spot Instances and Spot Fleet

      Spot Instances are the cheapest available resource on AWS, but they are not guaranteed to be available and may become unavailable while the instance is running. So spot instances are effective at decreasing the overall cost by as much as 90% compared to On-demand, but are not suitable for required computer services. The following are specification of Spot Instances.

      1. Can reduce cost up to 90% compared to On-demand

      2. Hourly spot prices for service change continuously

      3. You can set a max spot price you are willing to pay

      a. If the max spot price you defined is exceeded, you have a 2 minute grace period

      b. You must decide to either stop or terminate your instance

      4. You have an option for a Spot Block

      a. Guarantees no interruptions from 1 to 6 hours of time

      b. Spot Blocks were supported after 31 Dec 2022

      Placing Spot Requests – Request for spot resources, that contains:

      1. Max Price

      2. Desired number of instances

      3. Launch specifications

      4. Request type: one-time or persistent

      a. one-time is removed once request is complete

      b. persistent will become request again once it is stopped or terminated

      5. Valid start time and stop time

      Spot Requests Specifics:

      1. Request is made and AWS attempts to fill request.

      2. You can only cancel while in open, active, or disabled states.

      3. You have to cancel spot request and terminate any instances created by the request. In this order

      4. Canceling spot requests does not terminate running instances.

      Spot Fleet – is a set of spot instance + optional on-demand instances.

      1. Spot Fleet will try to fill the target resources with the price set by customer.

      2. AWS will take available pools of varing instance type, OS, and Availability Zones to attempt to meet request.

      3. You can have multiple launch pools the fleet can choose from.

      4. Spot fleet stops launching instances when capacity or max price is reached.

      5. Spot Fleets allow us to automatically request spot instances with the lowest price.

      Strategies in Spot Fleet

      1. LowestPrice – from pools with lowest cost.

      2. Diversified – Distribute across all available pools.

      3. CapacityOptimized – From pools with optimal capacity for number of instances.

      4. PriceCapacityOptimized – this is the recommended approach. Select from the pools with highest capacity avaiblable and then the lowest price.

      AWS EC2 Instance Connect

      AWS Instance Connect is an alternative to the SSH connection into your EC2 Instances.  This allows you to do a browser based connection into EC2.

      1.   The following is required before you create IAM user for your AWS Free Tier Account.

              –  An Active AWS Account with admin level permissions..

      2.   Logon to AWS as an IAM user at URL:  https://signin.aws.amazon.com/

      3.   From the Home Console type EC2 in the search bar, select the star next to EC2, and select EC2

      4.   On the right hand menu bar select Instance.

      5.   We currently have one EC2 Instances built out, select your instance with a check mark and press the Connect button.

      6.   By default you are already in the EC2 Instance Connect tab, it defaults uses the default ec2-user session.  Select Connect.

      7.   The Instance Connect terminal will startup.

      Using SSH in AWS

      SSH stands for Secure Shell and it allows you to control an AWS EC2 instances from a remote terminal from a command line interface.  

      1.   The following is required before you create IAM user for your AWS Free Tier Account.

      • An Active AWS Account with admin level permissions 
        • The PEM file for your EC2 instance, this was downloaded when you created the instance 
        • The public IP address of your EC2 instance  

      2.   Logon to AWS as an IAM user at URL:  https://signin.aws.amazon.com/

      3.   From the Home Console type EC2 in the search bar, select the star next to EC2, and select EC2

      4.   On the right hand menu bar select Instances.

      5.   We currently have one EC2 Instances built out, click on the Instance ID you want.

      6.   Record the public IP address of your EC2 Instance:  44.201.140.161

      7.   We stored all of our AWS files under c:\aws_files including the required PEM file (mysql.pem for this process.   NOTE:  Ensure that you do not have any spaces in the name of your PEM file or this process will not work.

      8.   Verify that you have allowed the port connection on 22 from everywhere in the security group of you instance.   This can be verified by going to the security tab and scrolling down to Inbound Rules.

      9.   By default AWS EC2 instances already have a user created called ec2-user.   So we can test our connection to EC2 via this account.

      10.   Open a power shell and move to the directory of your AWS files.

      11.   Retrieve the username you are currently logon as with the command $env:username

      12.   Change the permissions on you PEM file to only allow access to this user.

         $filePath = “C:\aws_files\mysql.pem”
        $acl = Get-Acl -Path $filePath

         $username = “larry”  # Use “Username” for local accounts
        $fileSystemRights = “FullControl” # e.g., Read, Write, Modify, FullControl

      $accessControlType = “Allow”

      $acl = Get-Acl -Path $filePath
      $accessRule = New-Object System.Security.AccessControl.FileSystemAccessRule($username, $fileSystemRights, $accessControlType)

      $acl.SetAccessRuleProtection($True, $False)
      $acl.Access | ForEach-Object {$acl.RemoveAccessRule($_)}
      $acl.AddAccessRule($accessRule)

      Set-Acl -Path $filePath -AclObject $acl

      13.   To configure your PEM file for use in the connection, execute command ssh -i <PEM_file> <username>@<public_ip_of_ec2_instance>

        ssh -i ./mysql.pem ec2-user@44.201.140.161

      14.   You are now logon to your EC2 Instance.