Category Archives: AWS

AWS EC2 Explained

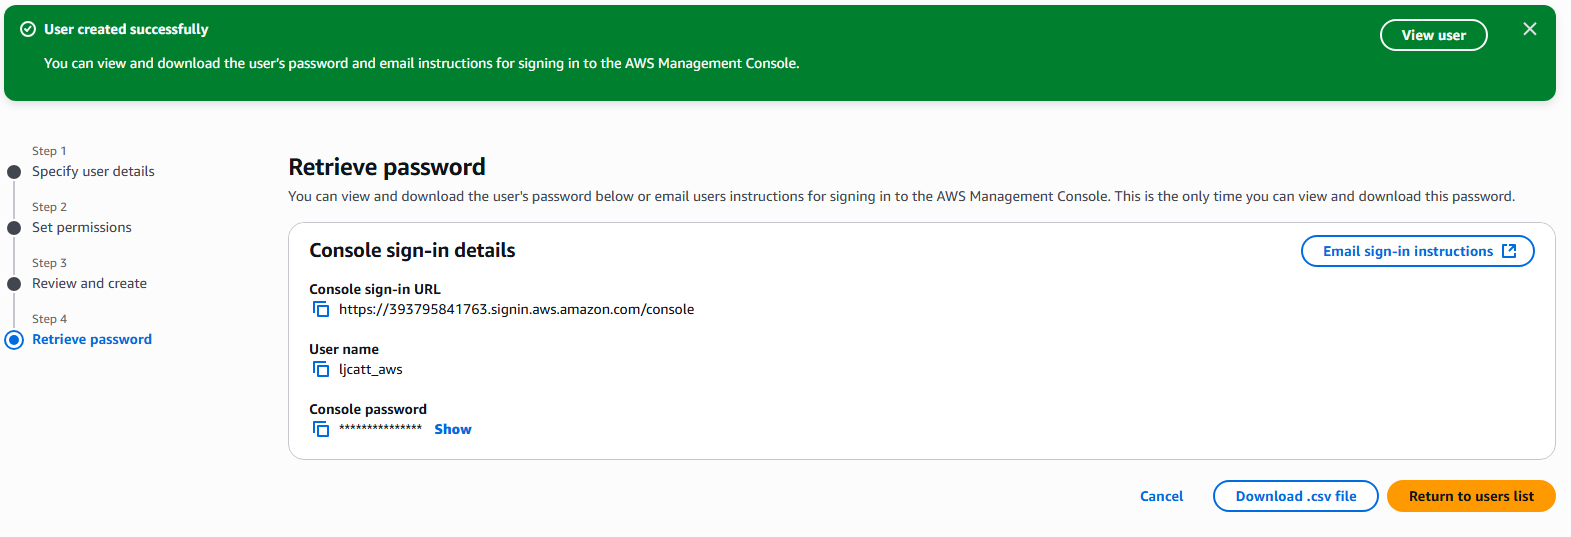
AWS EC2 stands for Elastic Compute Cloud and is the most popular Infrastructure as a Service offering by Amazon.  Knowledge of EC2 components and works is fundamental to working in the AWS Cloud.  

Capabilities of AWS EC2

 -Virtual Machine offering (EC2)

 -Virtual data storage Drives (EBS)

 -Distribution of Load or Load Balancing across EC2 Instance (ELB

 -Scaling service via auto-scaling groups (ASG)

EC2 Instance sizing and configuration options must be considered like a normal Data Center Server.  AWS provides standard EC2 sizing for any solution or organizational needs and you can build your own configuration.

 –  OS: Linux, Windows or Mac OS

 –  Number of Computer Cores per Instance (CPU)

 –  Amount of memory per Instance

 –  Storage and Type

  – Network-attached (EBS or EFS)

  – Hardware-attached (Per EC2 Instance)

 –  Number network cards and speeds

                – Public IP address

                – Private IP address

 –  Firewall Rules: security group

 –  Bootstrap script (Configure EC2 Instance): EC2 User Data

EC2 User Data is the startup instructions of your EC2 Instance and can contain:

 –  Installing updates

 –  Installing software

 –  Downloading files, data or update.

 –  Any other organizational processes necessary at startup.

AWS Best Practices for User Accounts


To maintain proper security and access to your AWS environment, it is important that we follow some basic security guidelines.  The following list is not all encompassing.

1.  Never user the root account except for setting up your AWS environment and creating initial IAM Administrators.

2.  Never create share accounts which are used by more than one user.

3.  Avoid assigning permissions to users directly and grant permissions via groups.

4.  Create groups for users and place each user in one or more groups.

5.  Ensure that you create a strong password policy which meets your organizational requirements.

6.  Ensure that you use roles to grant permissions to AWS Services.

7.  Ensure MFA is enabled for all users.

8.  Use only Access Keys for CLI/SDK connections.

9.  Audit unused permissions through IAM Access reports and IAM Credential reports and remove permissions not utilized.

10.  Do not share Access Keys or IAM User credentials.

AWS User Security Tools


AWS provides security tools in the form of reports and advisors that allow you to see the actions of users and gain knowledge of their behaviors within AWS.   We will cover IAM Credentials Reports and  IAM Access Advisor.

1.  The following is required before you create IAM user for your AWS Free Tier Account.

  • An Active AWS Account with admin level permissions..  

2.  Logon to AWS as an IAM user at URL:  https://signin.aws.amazon.com/

3.  In the search bar type IAM, highlight the Star next to IAM (So it will appear on you Console) and select IAM.

4.  On the left hand side of the screen, scroll down and select Credential reports.

5.  Select Download credentials report

6.  A CSV file will be downloaded showing you the activities of each user and other pertenate information about their activities.

7.  Now we will go to the IAM Access Advisor.  Back on the IAM left hand menu bar select Users.

8.  Click on the Users Name you are interested in,  this example ljcatt_aws

9.  Click on Last Accessed to view the AWS Services used

10.  You will see the report of services used or not used.  

Configuring AWS Custom Password Requirements

1.  Logon to AWS as the root user at URL:  https://signin.aws.amazon.com/

2.  Prove that you are not a machine.

3.  Provide you password

4.  Retrieve you code from your email account and enter it.

5.  Type IAM in the search bar and select IAM Console.

6.  On the left hand menu bar, scroll down and select Account settings.

7.  On the next page, select custom.   And select any options you desire for your password requirements.  To Complete, select Save Changes.

Configuring AWS IAM user for MFA

MFA stands for Multi Factor Authentication and provides a more secure user authentication method than just username and password.  MFA requires that you have something you know (IE a Password) and something you possess (IE a cell phone).   It is one thing to obtain someones password, but much more difficult to get the password and a physical device the user possesses.  At a minimum you want to protect the Root Account and IAM users with MFA.   In this example, we will be using google Authenticator on our cell phone.

Types of MFA devices:

  • Virtual MFA – Google Authenticator or Authy 
  • Universal 2nd Factor (U2F) Security Key – Yubikey,  
  • Hardware Key Fob MFA Device 
  • Hardware Key Fob MFA Device for AWS GovCloud(US)  

  1. The following is required before you create configuring MFA for IAM users and ROOT account. 
  • An Active AWS Environment. 
    • Root access to AWS 
    • An Active IAM User. 
    • A cell phone

2. Logon to AWS as the root user at URL:  https://signin.aws.amazon.com/ 

3. Prove that you are not a machine. 

4. Provide you password 

5. Retrieve you code from your email account and enter it. 

6. Once logon, click on the account name and select Security credentials. 

7. Select Assign MFA. 

8. On the next page, name your device (ljcatt_aws_root_mfa), select authentication app, and press Next. 

9. On the next page click show QR code, install Google Authenticator and open.  Scan the QR code. 

10. After Scanning the QR Code you will get two separate codes to enter, the first will be provided immediately and the second after 30 seconds.   Enter the first and second codes and press Add MFA button. 

11.  After which you will receive a confirmation.  

12. Test the MFA settings by logout of AWS by clicking the user in the top right corner and selecting Sign out 

13. Select Login to console, Root user, enter email address and click Next. 

14. Validate that you are not a robot. 

15. Enter your password and click Sign In 

16. You will see a request for MFA code sent to google authenticator.  Open the app and retrieve the code, which is only good for 30 seconds. 

17.  Once you provide the correct MFA code you will be logon to your AWS Concole. 

18. This completes the setup of MFA. 

Create AWS IAM Policies

IAM Policies govern the rights an individual user has in the AWS environment.  Policies can be assigned to both groups and individual users.  Inline policies are those granted directly to a user account.   It is best practice to assign policies to groups and then assign each user to a group.,

Policies consist of:

  • Version – mandatory specifies the iteration of the policy. 
  • ID – optional specifies the identifier of the policy. 
  • Statements – mandatory specified policy right. 

Policy Statement consists of:

  • SID – optional specifies the statement identifier. 
  • Effect – specifies the action of the statement ie(“Allow”,”Deny”) 
  • Principle –  specifies the account, user, role that this policy applies to. 
  • Action – list of actions this policy allows or denies. 
  • Resource – list of resources to which the actions are applied to. 
  • Condition – optional specifies when the policy is in effect.  
  1. The following is required before you create IAM Policies. 
  • An Active AWS Account. 
    • An Active email to receive alerts. 
    • Access to IAM User with administrative rights.  

2. Logon to AWS as the IAM user at URL:  https://signin.aws.amazon.com/ 

3. In the search bar type IAM, highlight the Star next to IAM (So it will appear on you Console) and select IAM. 

4. On the left hand side of the screen, scroll down and select policies. 

5. All default AWS policies will be presented to you on the screen as well as a button on the right hand side to create a custom policy.   First let us view an existing policy definition.  Select “AdministratorAccess “ policy 

6. On this page you will be presented with all the services contained in the “AdministratorAccess” policy,  click on the JSON tab to see the code for this policy. 

7. The page displayed is the actual JSON code that governs the “AdministratorAccess” policy. This is key because it allows you to build, edit and assign policies with code outside of the AWS GUI.  In future lesson we will learn to deploy various types of code to control your AWS enviornment. 

8. From the left hand sidebar select Policies ? Create Policy. You will be presented with a two step process to create a custom policy or you can choose the JSON editor to write you own code. 

9. We will create a policy for viewing objects.   Type list in the actions allowed, Select all the listed options, under resource select ALL, and press the next button. 

10. In the policy detail section type a Policy name and description.  The policy Access Analyzer is already selected and press Create policy.  

11. You will be brought back to the policy list page and can see your newly created policy.  Select the newly created policy ? JSON tab to view the code. 

12. Code for policy.   Admin_view will be displayed. 

13. Now we will create a new group with the policy of Admin_view.  On the left hand side of IAM menus select User Groups. 

14. Select Create group. 

15. On the create group page we are going to name the group “AdministrativeViewGroup”, select user “ljcatt_aws”, and policy “Admin_view”.  Than select button Create user group. 

16.  Now we have a new policy Admin_view in the group of AdministrativeViewGroup assigned to the user ljcatt_aws. 

Create AWS IAM Administrator Account outside of ROOT User

IAM (Identity and Access Managment)   is a global AWS Service which provides access for administrative and development functions in AWS.   We will demonstrate the creation of a user besides the ROOT user.

Points that should be remembered in AWS and IAM users and groups.

  • Root user should not be used except for setting up AWS and creation of Users and Groups. 
  • Users should correlate to unique individuals 
  • Groups are collections of like users 
  • Rights can be granted to both users and groups. 
  • Users can belong to multiple groups or no group at all. 
  • Groups cannot be assigned to other groups. 
  • IAM users and groups are global setting in AWS, they are not part of a region.  
  1. The following is required before you create IAM user for your AWS Free Tier Account. 
  • An Active AWS Account. 
    • An Active email to receive alerts. 
    • Access to the root user account. 

2. Logon to AWS as the root user at URL:  https://signin.aws.amazon.com/ 

3. Validate that you are not a robot. 

4. Enter your password. 

5. Open your email and retrieve the validation code. 

6. Enter your validation code. 

7. You will now have your AWS account console displayed. In the Search bar type IAM and a link to the IAM console will be displayed.  NOTE:  You can have a link created on your home page by clicking the star next to any resource in AWS. 

8. The IAM Console will now be displayed, select Users on the left hand menu selection. 

9. Currently we have no users other than root, which is not part of IAM.  Select Create User in the upper right hand side of screen. 

10.  You will be presented with a 4 step screen to create your new IAM user.  Enter a user name. Select IAM user, select custom password and enter a password, unselect change password at next logon.    NOTE:  When creating a user for another account ensure that you have the password generated for you and change password at next logon is selected. 

11. On the next step we will be granting permissions to the user.   Select create group in lower right hand side. 

12.  We will enter “root_group” and select AdministratorAccess for permissions.  Select Create User Group. 

13. Now you will see a group available to access.   Select the root_group and press Next 

14. A Review page will be displayed and select Create user. 

15. A Retrieve password Page will be displayed which allows you to download the credentials for the new account or email them to specific user.   Click Return to user list. 

16. A warning may appear about you saving the password.  Click continue. 

17. In the uppper right hand corner of you screen click on the user_id and select sign out.  NOTE: record the Account ID in this example it is 393795841763 

18. In the upper right hand side of the screen select Sign In to the console. 

19.  Enter the account ID, IAM username and password you just create.   Select Sign in. 

20.  You are now logon as your IAM user 

AWS Setting up Budget Alerts

Though we have  a Free Tier AWS Account, you do have access to all services within AWS.   A lot of these services are not available in the Free Tier, thus if used, you will receive a bill for services outside of the free tier.   To limit this charge we will show how to setup a budget alert, which will notify once you have crossed a certain charge.      We will setup three alerts in this lesson for the monitary amounts of $1.00, $3.00, and $5.00 dollars.

  1. The following is required before you create Budget Alerts for your AWS Free Tier Account. 
    • An Active AWS Account. 
      • An Active email to receive alerts. 
      • Access to the root user account. 


    2. Logon to you AWS account as the root user. 

    3. After you have logon, you will see your root user name in the upper right hand corner, click on your user name and select “Billing and Cost Management” 

      4. In the Billing and Cost Management Console, left and side scroll down to Budgets and select. 

        5. Select the create budget operation button. 

          6. Select “Use a template” and “Monthly cost budget” 

            7. Enter the budgeted amount in US dollars, emails which you want to receive notifications, and select Create Budget. 

              8. You will receive a page with your current budgets created. 

                9. Repeat steps 6 – 8 for the $3.00 and $5.00 budgets. 

                10. The final budget alerts you have are listed below. 

                  11. You can customize a budget by check marking the budge ? selecting actions ? edit 

                    12. The first page of the edit funtion will allow you to change: The Period of time, Recurring or expiring, Budget method, Budget amount, Budget Scope, Blended budge, Tags (Alternate name).  Select the next button. 

                      13. Second page allows you to further refine the budget alerts, click the Next button 

                      14. Third page allows you to add actions to IAM Permissions roles for normal users. Select next. 

                      15. Finally review your changes to the budget and Select Save. 

                      16. This completes setup of budget alerts. 

                      Create a AWS Free Tier Account


                      AWS allows developers and administrators to create a free account to test and evaluate the AWS enterprise offering. Please Note: AWS Free Tier Accounts do not restrict your ability to access any of the paid only services in AWS, thus ensure that all components you access are indeed part of the free tier to avoid costs.

                      1. The following is required for creation of a free tier:

                      – Active email account

                      – Cell phone that can receive SMS messages

                      – Credit Card number for charges outside the free tier.

                      1. Open a browser and navigate to the URL.

                      https://signin.aws.amazon.com/signup?request_type=register

                      1. Enter the email you have chosen to use and an account name then press Verify email address.
                      1. Validate that you are not a machine and select submit.
                      1. Go to your email and select email sent.
                      1. Enter the code and select Verify
                      1. Once email has been verified enter the password for you root user and select Continue.
                      1. On the next page Select Personal account, enter your information and check box the agreement. Finally select agree and continue button.
                      1. Enter your payment data and continue.
                      1. Enter your phone number on the next page to confirm your identity.
                      1. Verify your not a computer again.
                      1. Retrieve your code from the SMS cell phone
                      1. Enter code sent to SMS service and select Continue.
                      1. Select Basic support – Free Tier and select Complete Signup
                      1. Finally, you will be brought into the system, select Go to the AWS Management Console.
                      1. Below is the starting AWS Management Console.
                      1. The first two steps in new account is to setup billing alerts and define user beside the root user for administration.